How to use TeamLinx42?
Every team is able to share their most relevant process entry-points, documents, files and links to everyone in your organisation. Find the content that matters the most for you with the intuitive, tile-based dashboard. Organize your links with categories and by favorizing your most used tiles.
Download TeamLinx42 via the Microsoft Teams App Store. A full installation manual can be found here:
You can place the following link protcolls in TeamLinx42:
– http/s
– …
– …
Yes, you do. As an add-on for Microsoft Teams, TeamLinx42 only works within the Microsoft Teams App or Microsoft Teams Web App in an organizational environment with either Microsoft 365 work or school accounts.
TeamLinx42 is free for up to 10 users. We believe, it is crucial to test and validate the added value, TeamLinx42 creates for your organisation. The full pricing sheme can viewed here:
Hint: TeamLinx42 works best, when used by everyone in your organisation! The more teams are participating the higher the convenience, TeamLinx42 creates.
Within TeamLinx42 you are able to provide internal corporate information. External Accounts or guest accounts should not be able to access these information, regarding your company security.
Table of Contents
Introduction
On this page you will find useful tips and hints on how to get the most out of TeamLinx42.
Here you will learn how to easily share information with your colleagues and employees. But also, how each user can use the provided information to their advantage.
Help for Users
How to use TeamLinx42?
This section is useful for every user of TeamLinx42. Here you will find explanations on how to find and access stored resources.
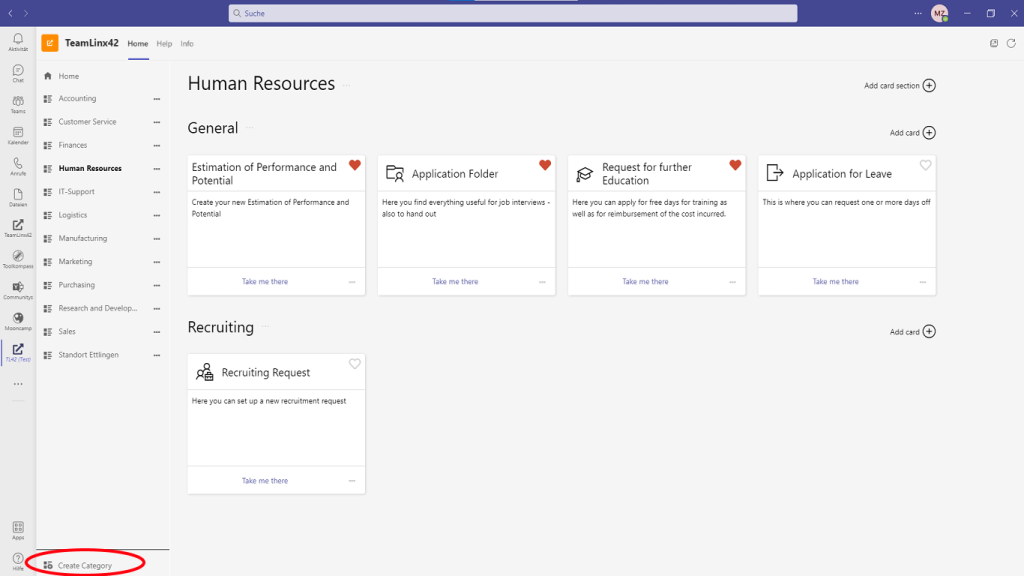
Categories
Within TeamLinx42 on the left side, you will find all the categories that have been created in your company and to which you have access.
You can store every entity you want as a category, e.g. organizational units, locations, company functions – it is all up to you.
If you want to share information with a specific group within your organization, you can easily create a new category – read more at “Create a Category”.
Opening a Category
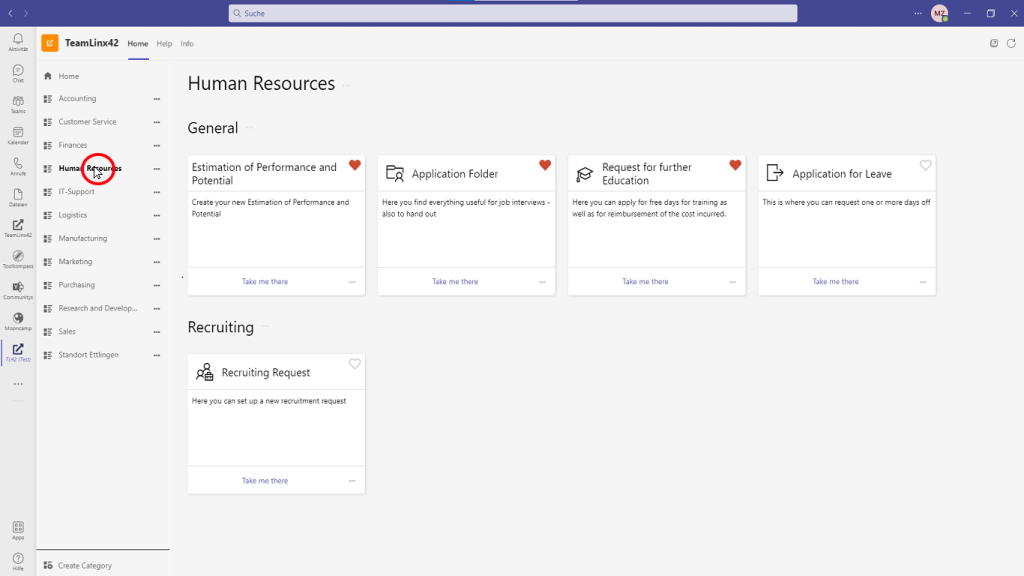
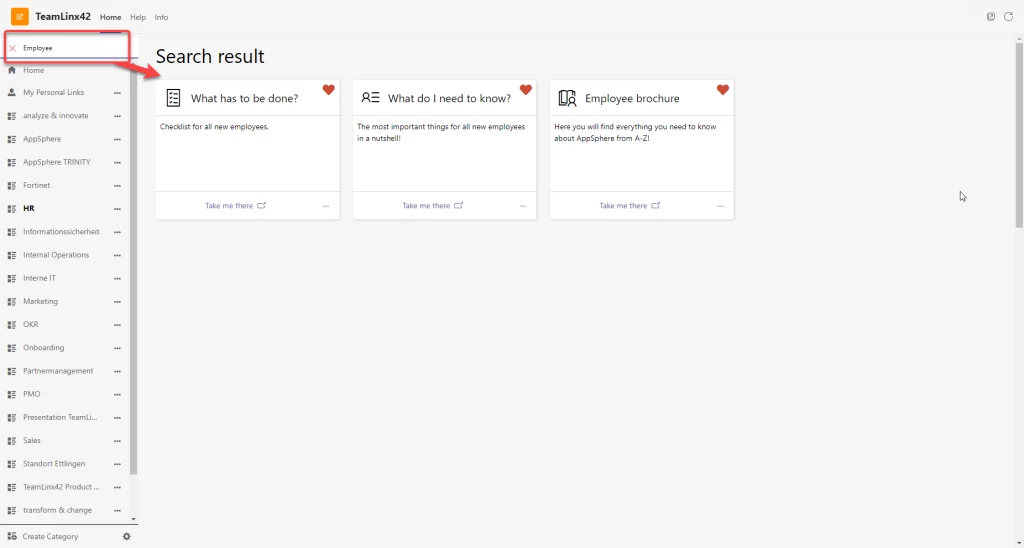
To open a category, navigate and click on the desired category as shown in the screenshot below.
After clicking on a category, all the stored resources will appear on the right as cards.
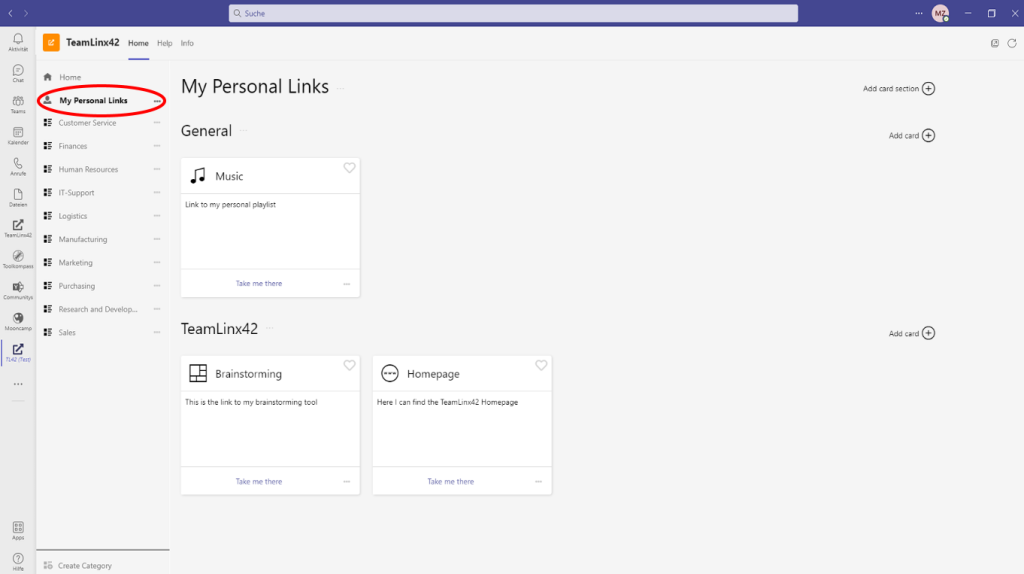
Personal Links
Within this category every user is able to store his own personal links.
Important: The links included within this categorie will only be shown to you.
You can create sections and cards as well as use Drag’n’Drop to sort your cards or set a card as a favorite. More information will be provided wihtin the following instruction.
Cards
Clicking a card will open the configured target e.g., an internal web portal.
If you have selected a category, all provided cards will appear that have been created by a category owner.
Each entry has a title, a description, and a link to the target.
Cards can be marked as Favorite by each user individually. To do this, simply click on the small heart in the upper right corner of a card.
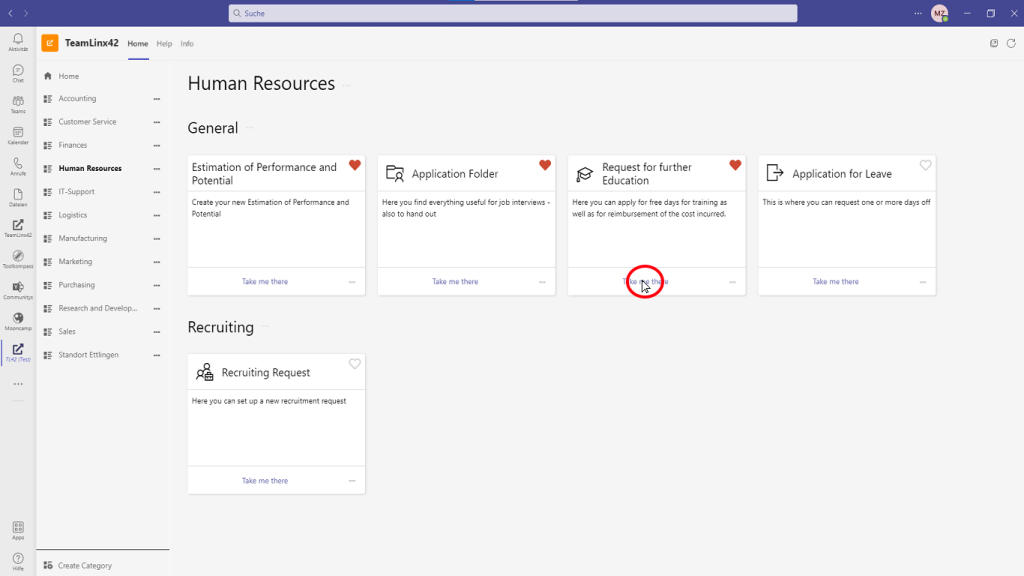
Open a target by clicking a card
To follow the link of a card, simply click on the “Take me there” button.
Now you will be redirected to the pre-configured target.
Set a Card as your Favorite
To set a card as your personal favorite, just click on the heart on the upper right corner of a card.
After you did this, the card will appear on the home screen within TeamLinx42.
Here you can see all your favorite cards.
If you want to un-favorite a card, you simply must click on the red heart again.
Now the card will disappear from the home screen.
Additionally, on the home screen you are able to use Drag & Drop to sort your favorites.
Search
With the search bar in the upper left corner, you can easily find every card stored in TeamLinx42 within your Company.
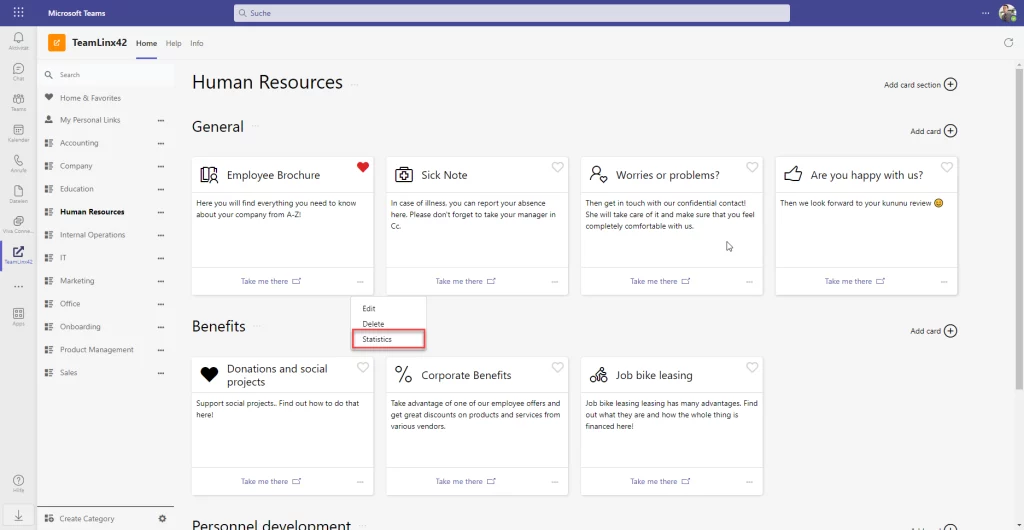
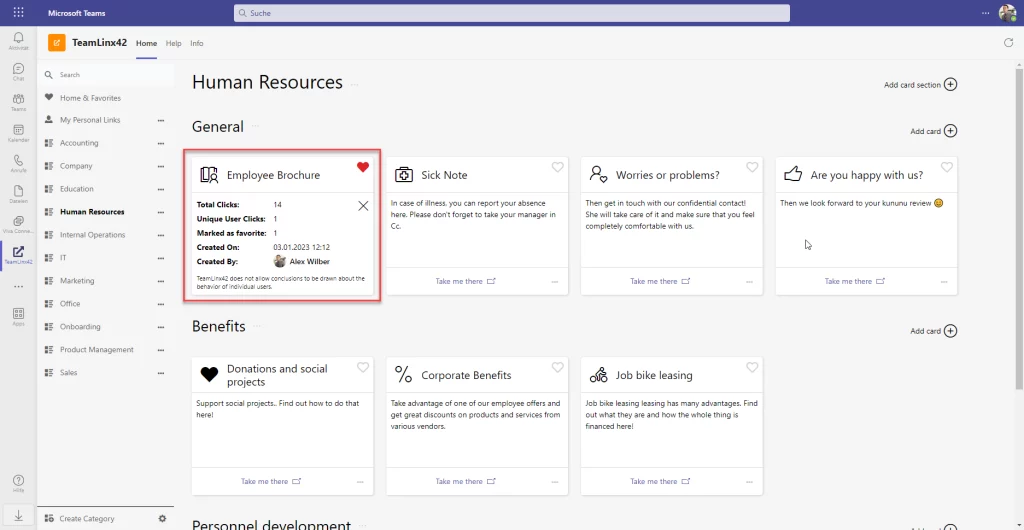
Statistics
With this feature you have an overlook of how often a created card has been clicked by your colleagues.
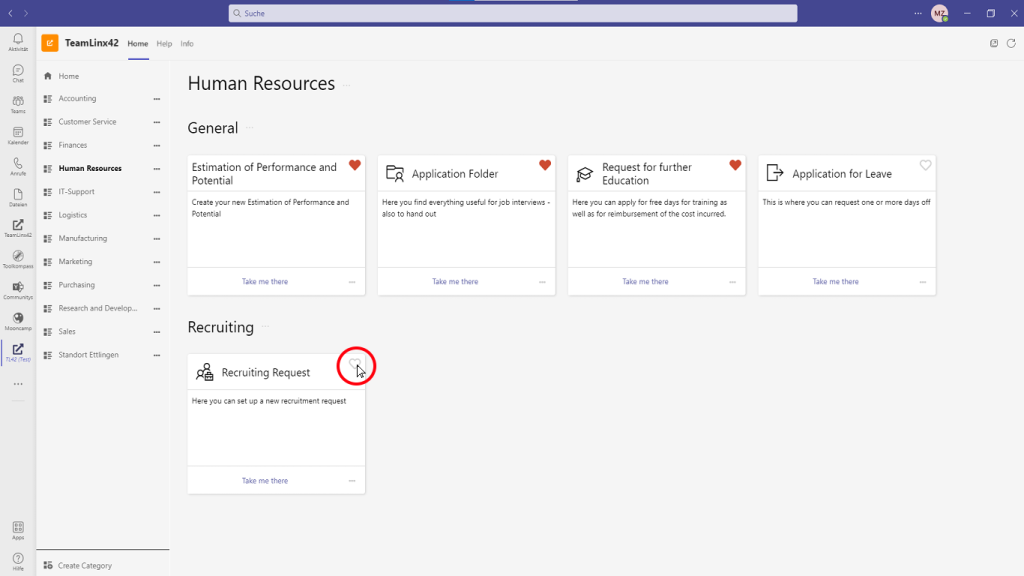
By clicking in the Meatball-Menu of a card “Edit”, “Delete” and “Statistics” will appear. Click on “Statistics” if you want to see the click-rate of a card.
Here you can see the total clicks, the number of unique user clicks and the creator and creation-date of the card.
Important: No personalized User-Information will be provided to your company or any other person.
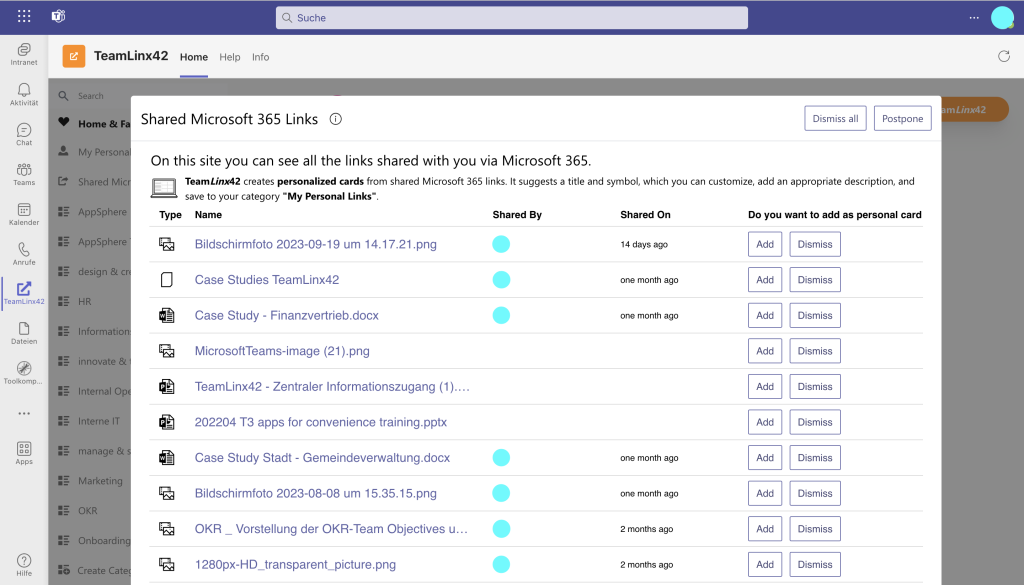
Shared-Links
Shared links shows users the bundled content shared with Microsoft 365, and for each of these content offers to create a card for the category of personal links. For content that has been shared, for example, as follows, this option is available:

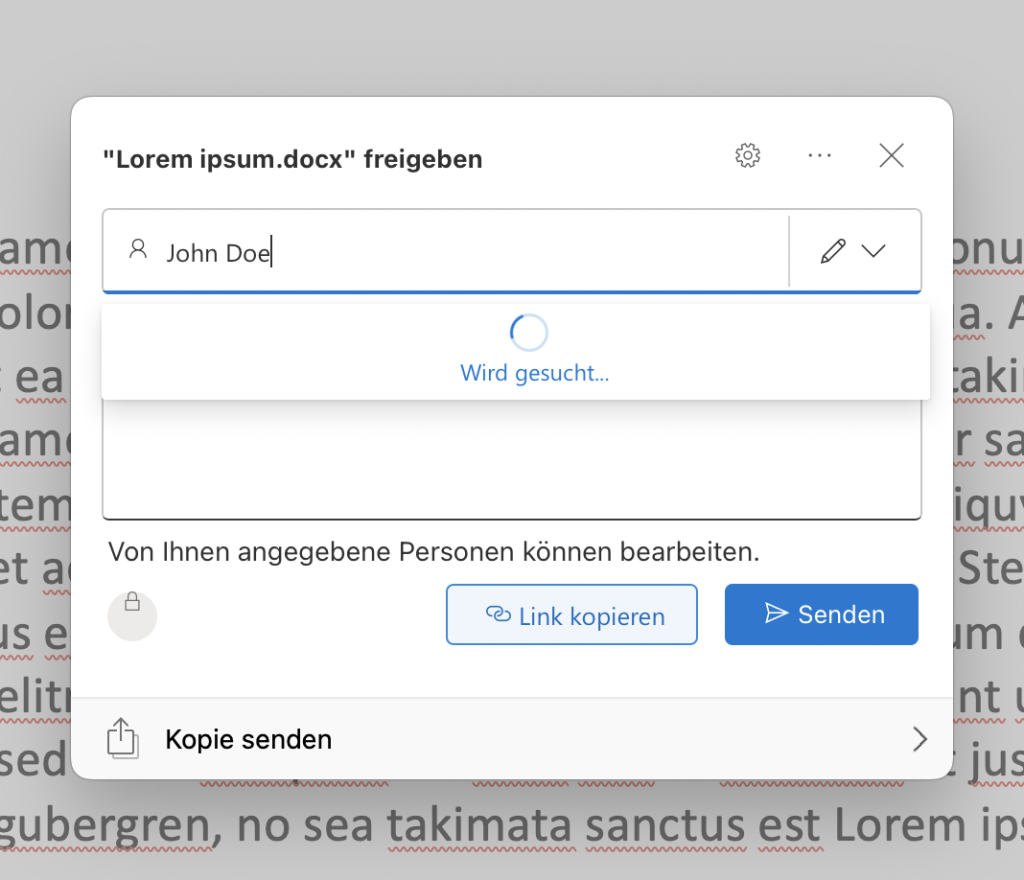
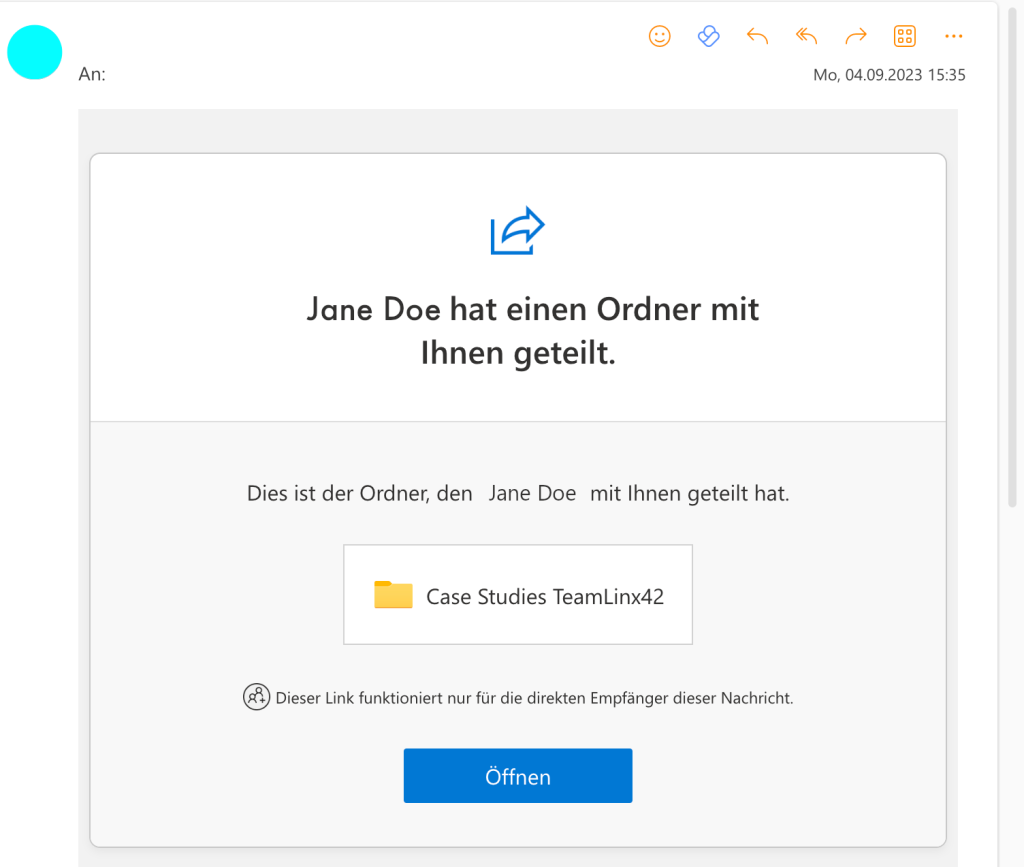
This does not apply to content sent in chats or teams from Microsoft Teams.
In addition to the possibility of creating cards from individual links or ignoring them, there is also the possibility of irgnoring all shared links or addressing them at another time.
How to publish information within TeamLinx42?
This section is especially helpful for users who want to share target links to other users within their organization.
When you want to create a category, you are automatically set as the category owner. This means that you and admins can add entries to that category and make changes. You can also add additional category owners manually by navigating to “Manage” from the “Meatball Menu”.
Categories
Create a Category
To create a category, click on “Create Category” in the lower left corner. You can choose if it’s a public category, visible to everyone in your organization, or a private one, which only certain people can see. Please note that TeamLinx42 administrators can also see private categories.
You can make someone a category owner, giving them full control to manage it. For private categories, you can add people as members so they can see the category.
Edit a category
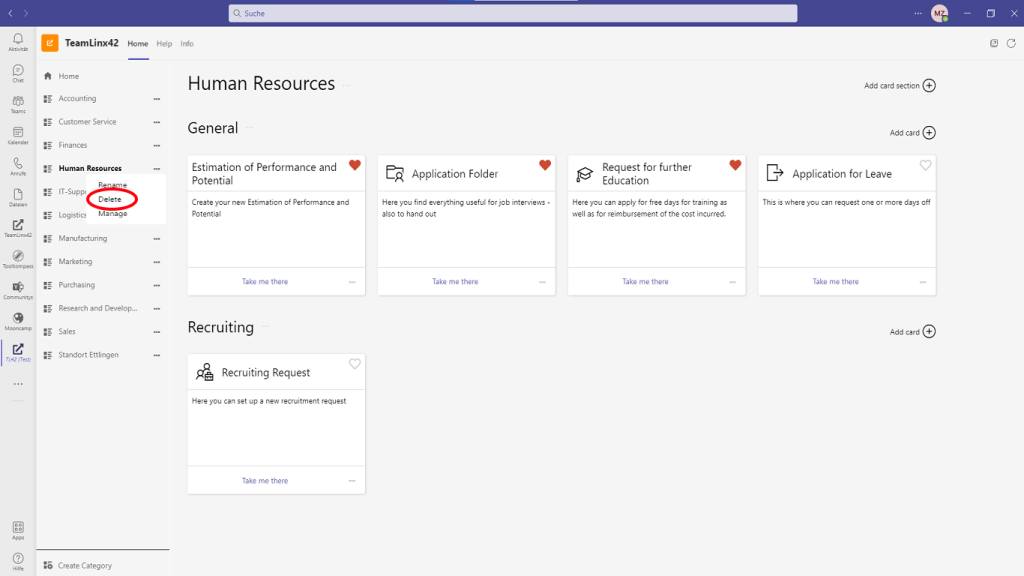
Category owners and admins can change the name of a category or delete it at any time.
To do so, you need to click on the “Meatball Menu” next to a category and the menu items “Rename” and “Delete” will appear.
Use “Rename” to change the name of the category.
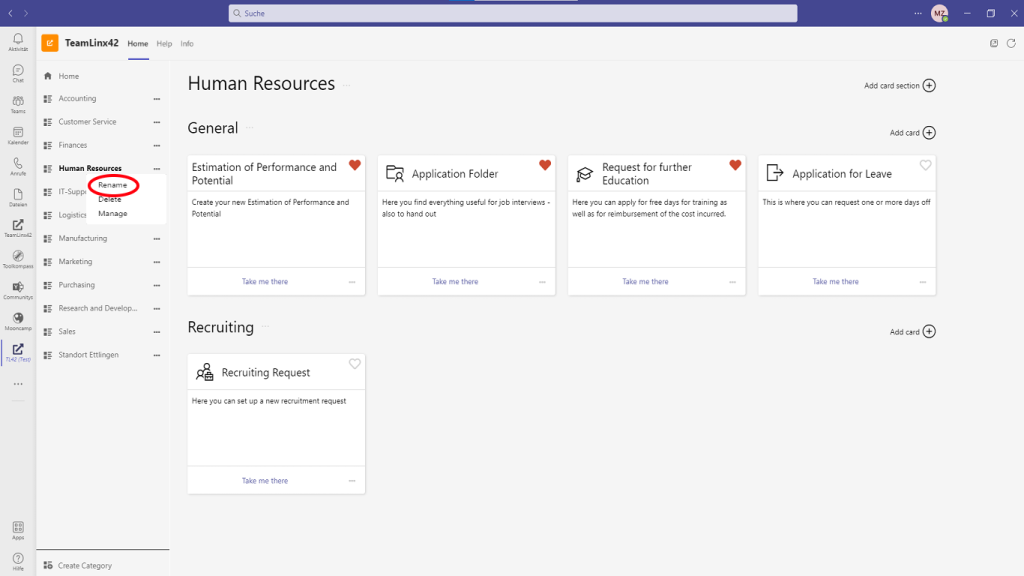
Use “Delete” to delete a category.
Warning: This will delete all cards within the category as well.
Cards
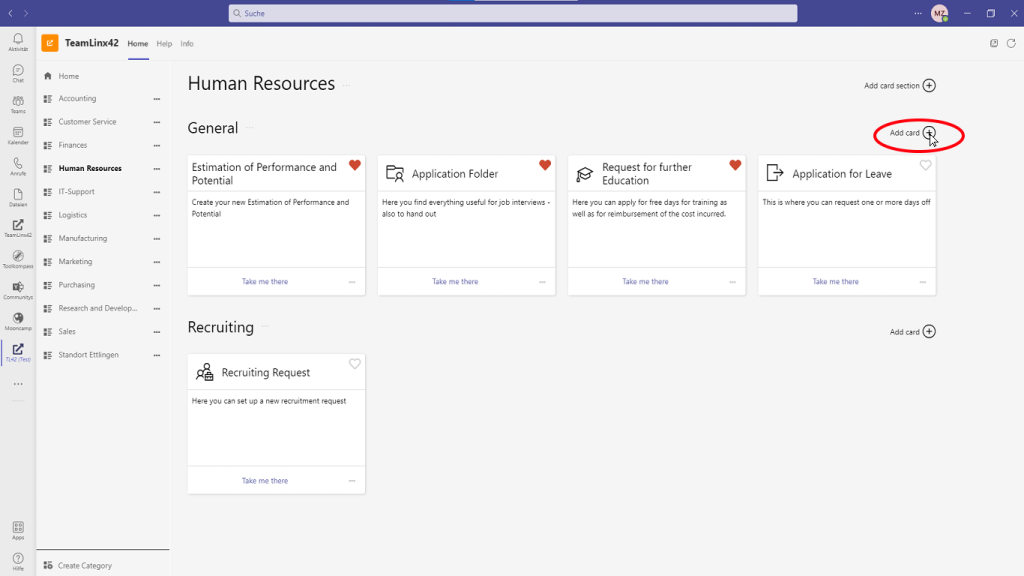
Create a Card
To create a new card, you just need to click on the plus sign in the upper right corner next to “Add card”. An empty card will only appear for users that are category owners.
Additionally, if you are the category-owner or admin, you are able to use Drag & Drop to sort the cards.
After clicking the plus sign, input fields for title, description and link will appear. In these fields you can enter the appropriate information you want to provide to users.
By clicking the link icon, you can test if you have typed in the link properly.
Additionally, in the upper left corner you can choose an Icon for your card.
If you click on the symbol, an icon-gallery will appear. Here you can choose your icon, to personalize your card.
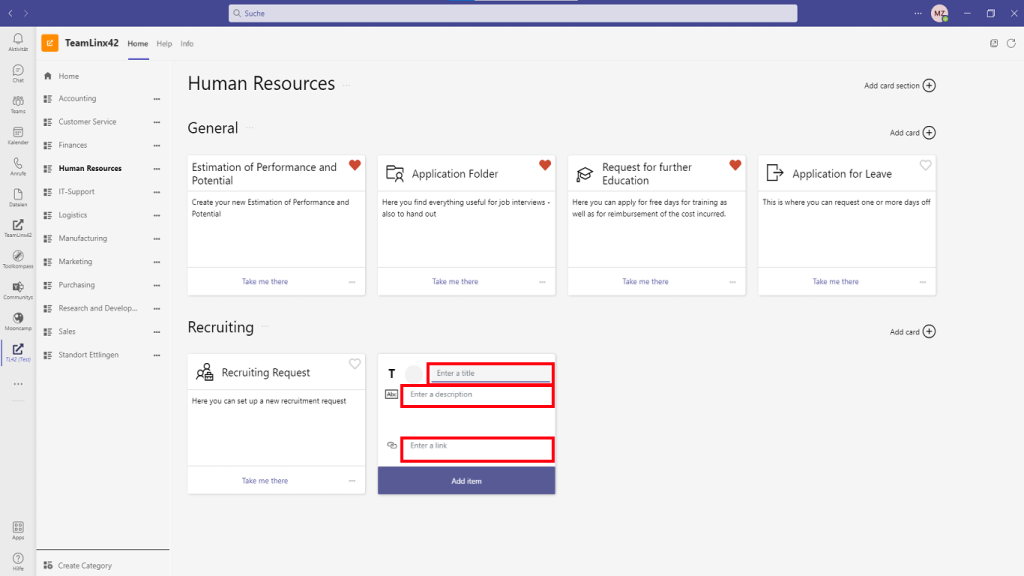
Please click “Add item” to save the card.
A newly created card will then appear.
Edit a Card
As a category owner or admin, you can make changes to your cards or delete them, at any time.
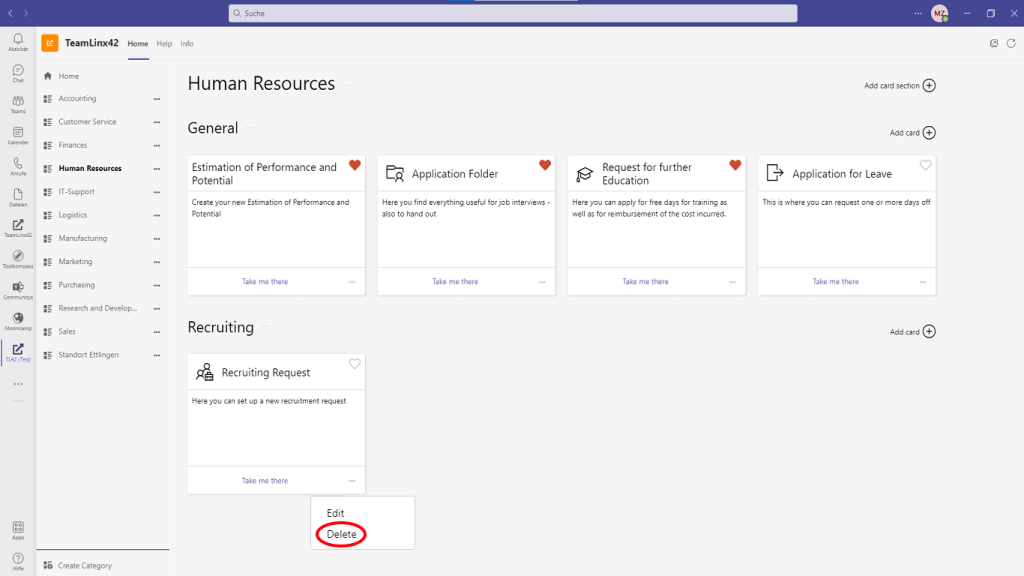
To do this, simply click on the “Meatball Menu” on the tile. After clicking, “Edit” and “Delete” will appear.
If you click on “Edit”, the input fields for title, description, link will appear again, and you can make any changes you want.
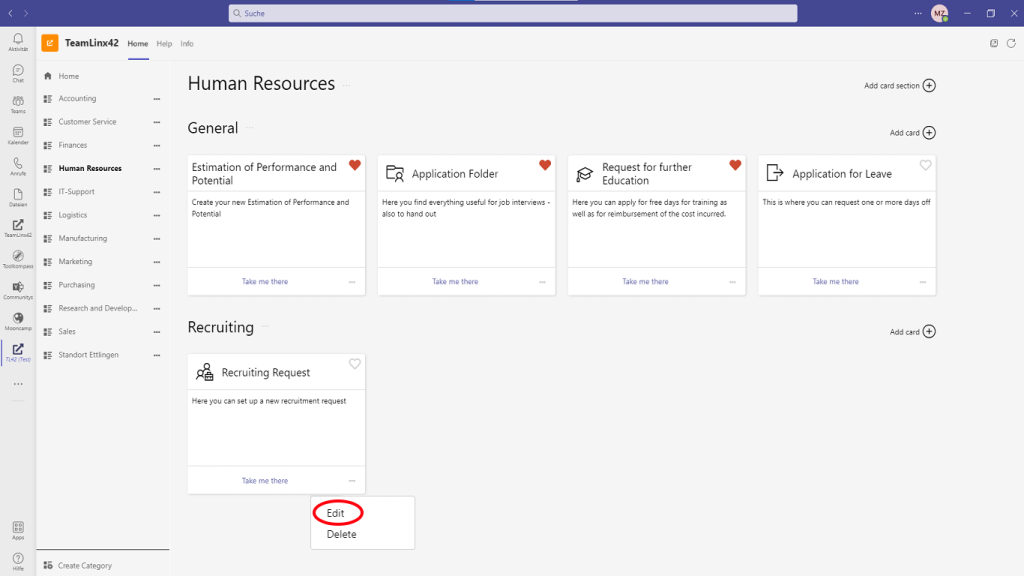
Click “Delete” to delete the entry easily.
Sections
Sections allow you to better sort and subdivide the categories
Create a Section
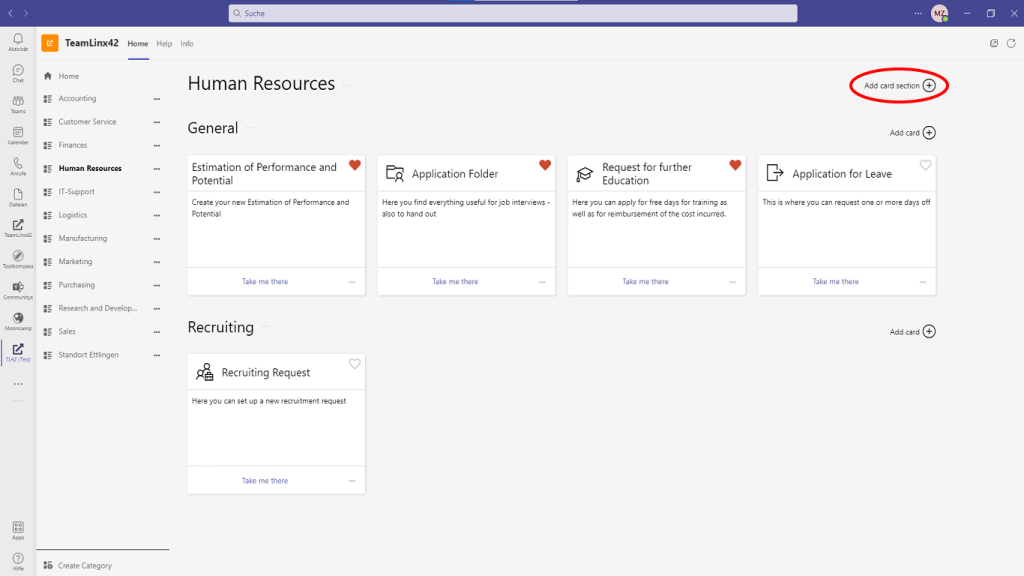
To create a new section, you just need to click on the plus sign in the upper right corner next to “Add card section”. Now you can enter a name in the bottom line
Edit a Section
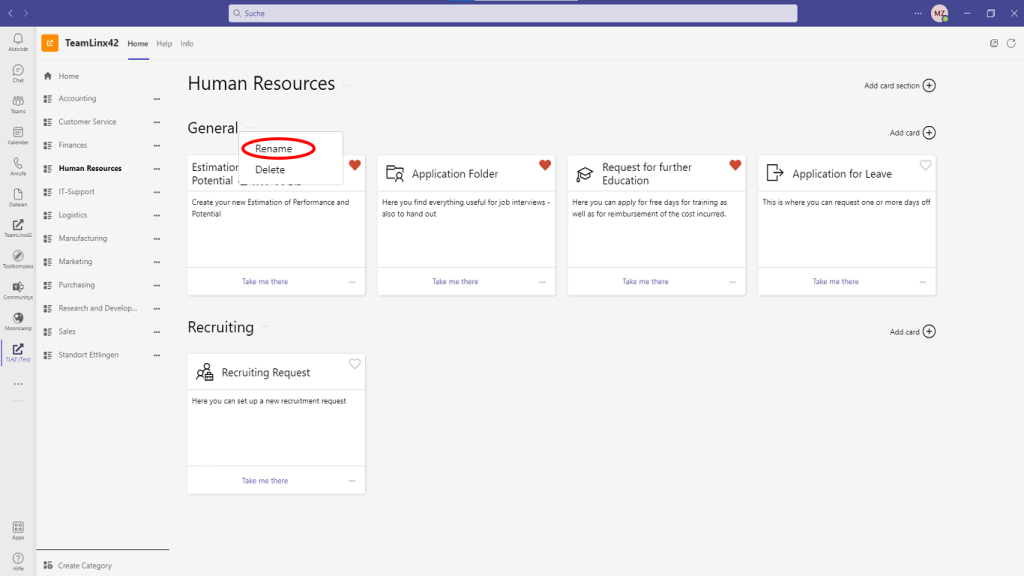
As a category owner or admin, you can make changes to your sections or delete them, at any time.
To do this, simply click on the “Meatball Menu” next to the title. After clicking, “Rename” and “Delete” will appear.
Use “Rename” to change the name of the section.
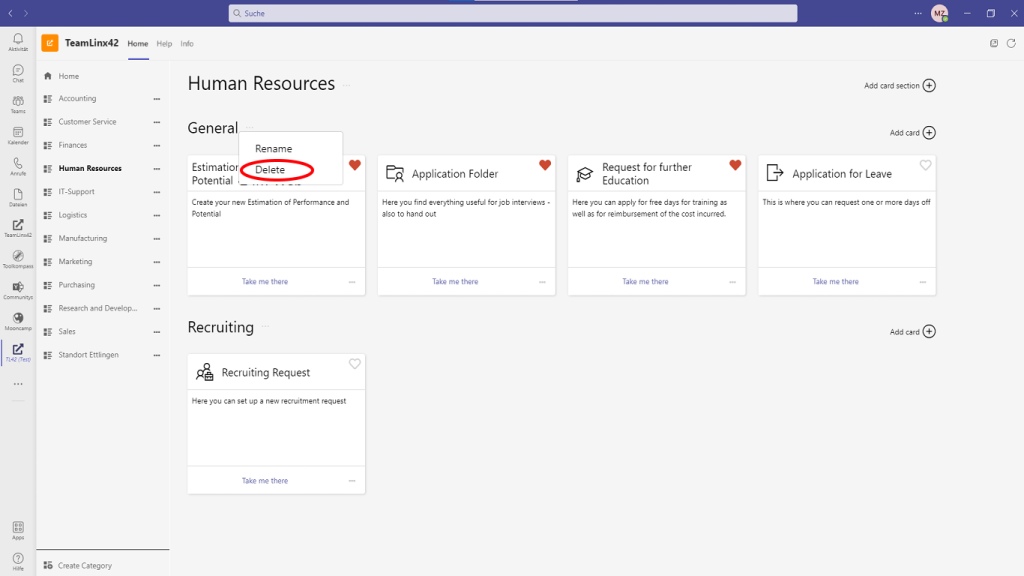
Use “Delete” to delete the section.
Warning: This will delete all cards within the section as well.
Feedback
If you have any feature request or discovered a bug – please feel free to send us your feedback via e-mail to teamlinx42.contact@appsphere.com
How Teams-Admins configure TeamLinx42
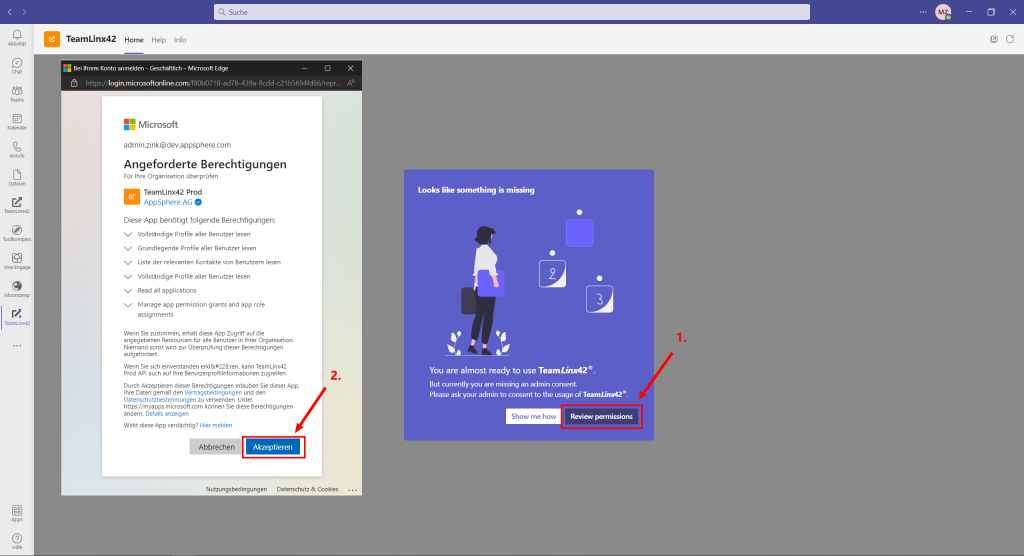
1. First Point is how to give admin consent. There are two possible ways to do this.
ATTENTION: You need a global admin role to give permissions for your company.
1. With the first visit the following note will appear. Here you can click on “Review permissions”. Afterwards, click “Accept” to give permission to your users.
or:
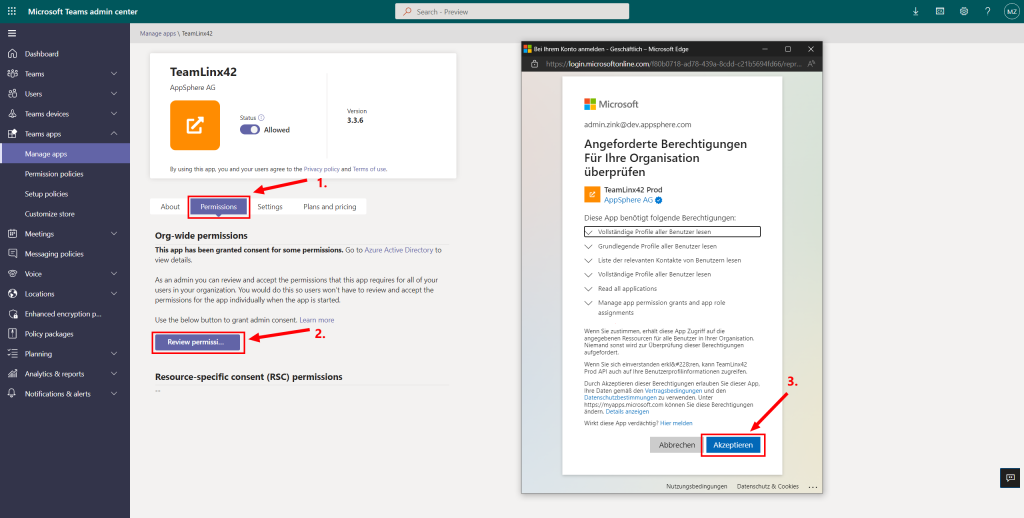
2. Sign in as “Global Admin” under:
https://admin.teams.microsoft.com/
To do this, under “Manage Apps” go to “Permissions”. With the button “Review Permissions and Consent” you’ll consent the necessary permissions for all your users.
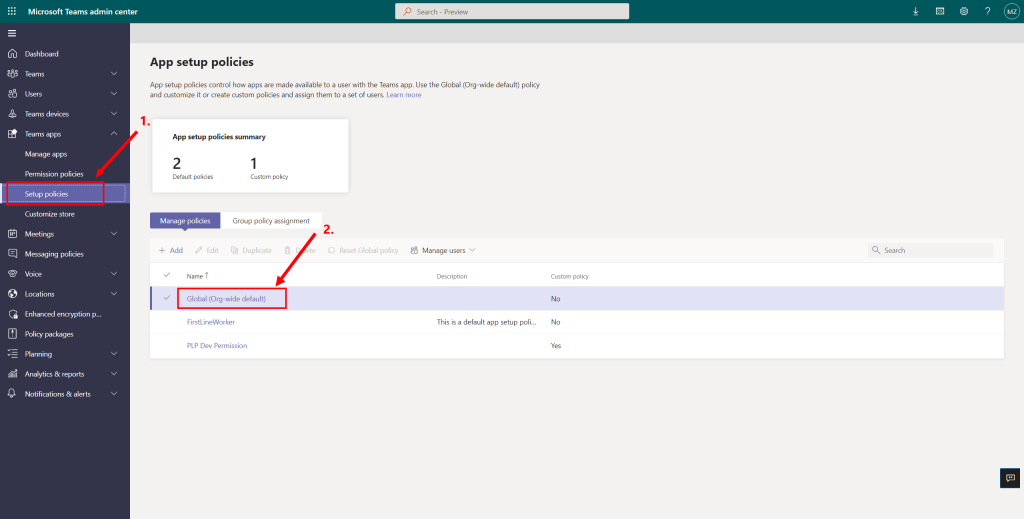
2. To roll out TeamLinx42 to your users go to „Setup policies“ and select your rollout strategy. If you want to rollout the app to specific users or groups, we recommend creating an additional setup policy – but be aware to configurate the policy as closely as possible to the default global policy that you don’t disrupt the users experience regarding other App Setup configurations. If you want to rollout the app to all users, choose “Global (Org-wide default)”.
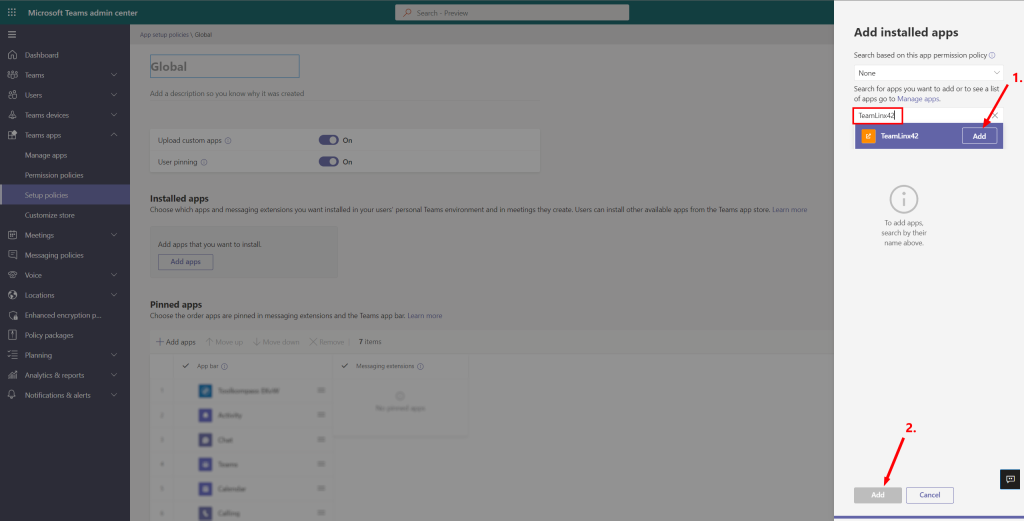
3. Click „Add Apps“.
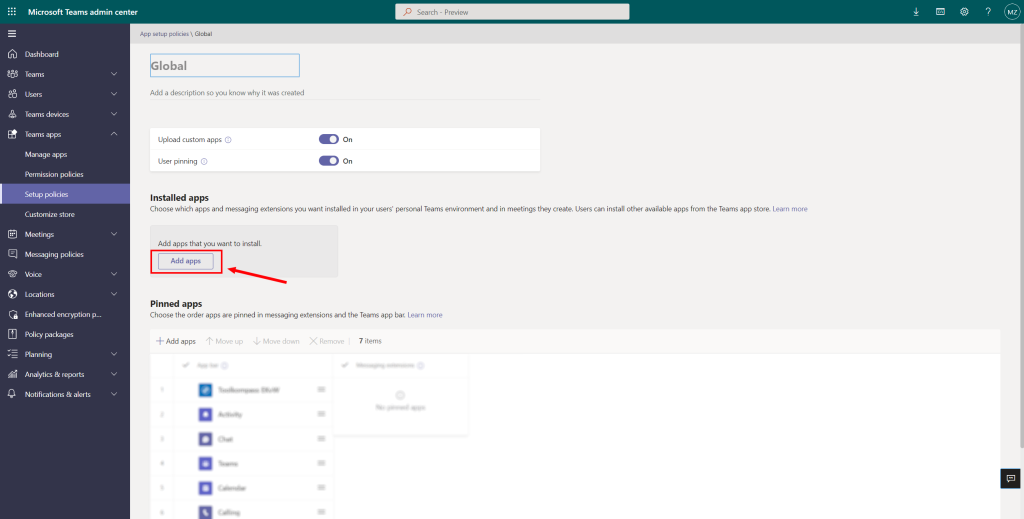
4. Search for “TeamLinx42″ and click „add“ to add the App. Click „Add“ again.
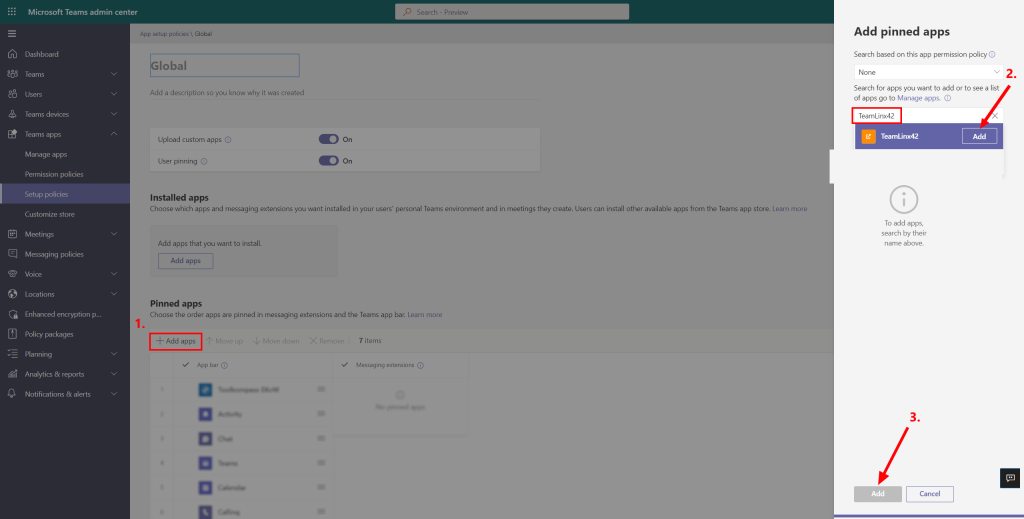
5. If you want to pin the App to the users navigation bar, click „Add apps“ in the section „Pinned Apps“. Search for “TeamLinx42″ and click “Add App” twice.
6. Important: Please click „Save“ to start the rollout procedure.
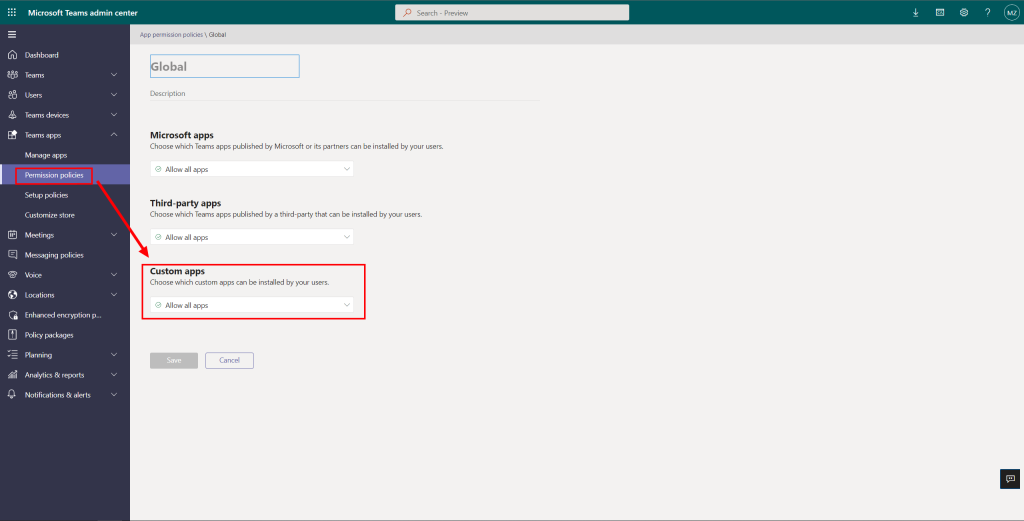
7. Important: Please check and customize the permission policies, if necessary. Depending on your organizational policies you have to add TeamLinx42 app to the list of allowed custom apps within the appropriate policy (e.g. “Global”). If the setting is set to “Allow all apps” you don’t have to change the setting.
You must wait for a couple of minutes or even hours to rollout this configuration to all clients and users.
Note: the first non-global-admin or non-Teams-admin user will automatically be registered as TeamLinx42-Admin.